

How To Install A Sliding Door In A Shipping Container

A Building made from a shipping container needs doors for people to enter and windows to bring in natural light. Installing doors and windows in a shipping container is a little different than installing them in conventional stick and brick construction.
nine Steps to installing doors and windows in a shipping container are:
- Selecting the doors, windows and their frames.
- Select the type and size of metal framing to install in the new aircraft container opening.
- Cut and weld the metal framing to the size of the new door and window frames.
- Marking where the shipping container is to be cutting for the new framing for the door and windows.
- Cutting the new door and windows openings.
- Weld the metal frame to the shipping container at the new cut opening.
- Install the new door and windows into the metal frame.
- Seal all around the door and windows.
- Install interior and exterior finishes effectually the door and windows.
Selecting the Doors, Windows and Their Frames
Door and window types come in several different materials and sizes. Each will affect the mode you will install them.
The shipping containers are synthetic with a Cor-Ten steel. Some metals react differently to others. For example, mixing steel with aluminum tin can cause the aluminum that is touching the steel to corrode through a process chosen galvanic corrosion.
Painted aluminum and steel helps to separate the dissimilar metals from corrosion. Using stainless steel screws, bolts, nuts, washers can besides help separate the raw aluminum from the raw steel.
Choosing steel, forest, or other non-metal doors and windows will assistance y'all bi-pass any concern of galvanic corrosion.
The thickness of the wall will exist determined by the corporeality of insulation is installed, stud sizes, and if there are any exterior elements (similar siding, brick, stucco, and/or insulation). The wall thickness will affect how you lot will frame and install the door and windows.
Select the Size of Tube or Bending to Use for the Box Section Frame
Take an architect or engineer size the tube steel or angle for the framing effectually your shipping container'southward doors and windows. The amount of structural load placed on the opening and the depth of the finished wall will need to be considered when determining the correct size of the steel tube or angle for the framing of the openings.
The box department frame volition exist built with either a steel tube that is foursquare or rectangular. Although, some builders adopt to use steel angles.
Tube steel and angles have their own advantages.
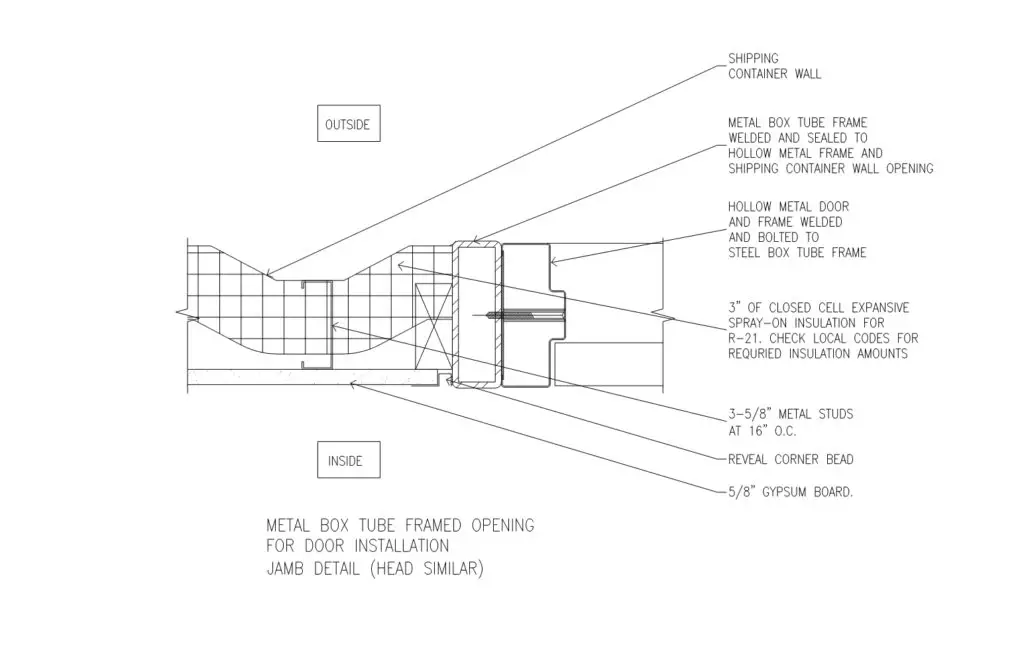
Pros and Cons of Using Steel Tubes to Frame the Door and Window Openings
Using a tube steel to frame around the opening, there is a consummate and continuous surface from the forepart outside face of the shipping container to the total depth of the insulated and finished wall. The depth of the actual door or window frame should match the depth of the tube steel frame. This makes it easy to take a surface to install the door and window frames onto without having to add studs effectually the opening.
But, when cutting the opening in the shipping container'south wall can be a little difficult. Because of the aircraft container walls are not flat but corrugated, the cutting of the opening while passing along the valleys and ridges of the corrugation can cause the cutting not to be exactly straight and square.
If the opening in the shipping container wall is not straight and square, there will be gaps in some areas that might exist too large to fill with a bead of weld.
Besides, the water tightness at the intersection of the tube steel and the shipping container opening will be sealed just with the integrity of the weld and the beading of sealant forth this connection. If the aircraft container is to be built in a hot, dry location, the beading of sealant can deteriorate and permit h2o to enter the building at its cracks.
The following link is mentioned so y'all will have a better idea of the sizes bachelor. It is not an endorsement of the company that posted the sizes chart for either the square or rectangular tubes.
Here is a link to the diverse sizes of square structural steel tubes bachelor: Square Tube Sizes Chart.
Hither is a link to the various sizes of rectangle structural steel tubes available: Rectangular Tube Sizes Chart.
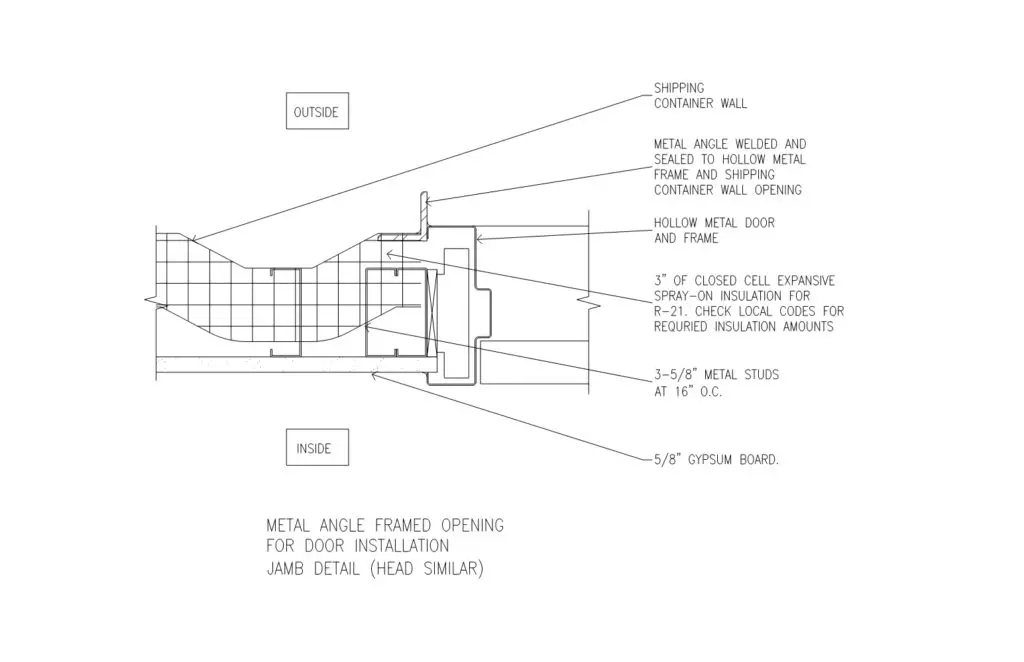
Pros and Cons of Using Steel Angles to Frame the Door and Window Openings
Install a steel angle to frame the opening by placing the dorsum leg of the angle along the within face up of the shipping container wall with the other leg sticking out. Doing this will cover any irregularities along the cut opening in the aircraft container wall because the dorsum leg overlaps those gaps.
This helps make the opening h2o tight and piece of cake to seal. The water tightness is not strictly relying on the sealant simply likewise from the overlapping metals.
Unfortunately, there is non a full surface forth the opening for the door or window frame to be installed confronting. So, there will need to be additional studs used on the inside face of the aircraft container wall to match the depth of the tube steel frame.
Here is a link to the diverse sizes of steel angles bachelor: Steel Bending Sizes Chart. Once more, I am non endorsing the company of the website. They just had a good ready of tables to review.
Cut and Weld the Box Section Frame Together
Having the actual door or window frame on site will allow you to measure exactly the size the box section or the angle needs to be.
You lot want the inside dimensions of the metallic frame to exist close to the same dimension of the outer frame of the doors and windows. But, allow for any irregularities. Likewise, allow an additional modest amount to fit the door and windows into the metal frames. This additional small amount tin can be fill with sealant in one case the doors and windows are installed.
Since door frames do not have a lesser support, like the sill of a window, you should cut and weld a temporary back up bar between the vertical legs at the lesser of the box frame. This will help to continue the box frame square when installing it into the opening.
Without the back up bar, the box frame can rack into an angle causing it to be brusque from being square. Even if yous measured the pieces exactly correct, if the box frame racks, then the door frame will not fit into the box frame opening.
Mark Where the Door and Window is to exist Installed Onto the Container Wall
Hither's a tip that will make it easier to agree the box frame against the container wall while tracing around it for the cut line.
Weld two 1/iv″ thick x iii″ 10 half dozen″ steel support plates on top of the bottom rail of the aircraft container. These temporary plates are to exist placed under the bottom of each vertical parts of where the box section frame are going to be placed. The plates will support the box section frame when holding it up against the container wall to exist traced.
Utilize a piece of chalk, soft pencil, or felt tip marker (only if you are planning to paint over the marker later on) to draw the cut line around the box frame.
When tracing around the box department frame, draw the marking no more than 1/xvi″ larger than the projection of the box frame to the side of the container wall.
After the opening for the door is marked on the container wall, remove the 2 temporary metal support plates and grind the remaining surfaces smoothen.
Cutting the Door and Window Openings with a Manus Grinder

Begin by cutting the bottom and then cut the sides.
In one case the cuts forth the bottom and sides are done, place two 2×4's into the opening. The lesser of the 2×4'south to be on the ground exterior the shipping container with the tops poking up within the shipping container. Don't bend the walls of the shipping container and make the cutting of the top cutting out-of-line.
And then, cut the top from inside the aircraft container. Once the entire opening is cut, the console that is cut away will slide down the two two×4's away from you to to the exterior.
Be aware of anyone around this work area and keep everyone safely abroad from your piece of work expanse before cut the walls of the shipping container.
Here is a link to a YouTube video that shares how to safely employ a paw grinder at Grinder Safety Video.
Welding the Box or Angle Department Frame into the Container Wall
Before you start welding the metal frame onto the shipping container walls, make sure that the walls haven't bowed out since cutting the openings. If it has bowed out you volition need to either weld some temporary hooks on the side and pull the wall back to position with a roped tied back beyond. Or, temporarily weld a metal stiffener at the bow to straighten information technology out.
Utilise tack welds at first to initially fix the frame onto the container wall along the sides and then top and bottom of the box or bending section frame.
Next, place a full weld across the top of the frame.
Then, place welds that are 4″ long and along each side of the frame.
Following that, weld a ane″ stitch weld at x″ to 12″ on center (o.c.) all along the sides and bottom of the box or angle department frame.
Here is a link to a YouTube video that shares how to safely weld at Welding Safety Video.

Install the Door or Window within the Connected Box or Angle Section Frame
As mentioned above, connecting Aluminum door or window frames to the steel box frames can cause galvanic corrosion.
Use neoprene washers or pads, wood blocking, PVC shims, or plastic separators to isolate the unlike materials. Painted surfaces tin besides help at reducing the threat of galvanic corrosion. But, exist aware that whatever spiral holes will not have the protective pigment in them.
Mechanical connectors, like stainless steel screws, will limit the possibility of corrosion too.
Some shipping container home builders do not use any mechanical fasteners when connecting their doors and windows within the box or angle section frames. Instead, they rely upon the strength and durability of the construction adhesives.
This way, they are non cutting additional holes into the frame that can cause corrosion and water infiltration. But, I have not seen enough to exist fully satisfied that it is a ameliorate method than using mechanical fasteners.
Seal All Joints Effectually the Door or Window
All gaps need to be filled with a continuous bead of sealant.
Choose a sealant that will wait proficient with the other finishes of your house in exposed areas. Sealants come in a lot of colors. Some are paintable. So, you can paint the sealant when you lot are painting the frames and walls the sealant comes in contact with.
Install Finishes Around Door and Window
Finishes come in as well many variations to exist fully discussed in this article. But, when installing the doors and windows, keep in mind how they volition meet up with any interior or exterior finishes you will have.
Usually, the interior finish will be in line or slightly proud (further into the room) from the surface of the door or window frame. Knowing where your interior finished wall is going to be volition help you determine how deep your box section (if you choose to use a box section instead of an angle section) will exist.
When installing outside finishes (like siding, stucco, exterior insulation, masonry), y'all volition want to install flashing between the outer face of the shipping container and the exterior finishes. Brand provisions as to not trap water against the shipping container walls by using vapor barriers, weeps, and air spaces (where advisable) betwixt the shipping container exterior wall and the exterior finishes you choose to install.
Any exterior end you lot select will affect the way you finish out effectually the doors and windows. Some ways that are used to finish out the exterior walls at door and window openings are to use wood, PVC, or metal trim effectually the openings. The trim can hide any irregularities where dissimilar finishes run into each other.
For more data nigh how to install siding onto your shipping container, become to How to Install Siding on a Shipping Container.
Safety Concerns When Installing a Door or Window
The use of ability tools and working around heavy sharp metal edges exposed when cut, requires the people working around them to practice all safety precautions.
Do non try to do all of this lonely. It is faster and safer to take another person assistance you install the doors and windows. Just be certain that everyone understands how to safely piece of work in this type of surroundings.
Tools Needed
- Steel Box Section Frames or Steel Angles
- Box Section Back up Plates or Steel Angles for a Support Bar
- 240V Welding Fix (Hither is a link to a entire beginner's welding assault Amazon)
- Paw Grinder (Hither is a link to a hand grinder on Amazon)
- Power Drill (Here is a link to a Ability Drill on Amazon)
- Spirit Level (Hither is a link to a spirit level with magnets that piece of work great with the metallic shipping container walls on Amazon)
- Record Measure out (Here is a link to my favorite brand of various length of Record Measure on Amazon. I utilise this all the time!)
- Impact Driver (Here is a link to a adept Bear upon Commuter on Amazon)
- Chalk or Chalk Pen (Here is a link to a Chalk Pen package of 6 on Amazon)
- Hammer or Mallet (Hither is a link to a Hammer on Amazon)
- TEK Screws (Here is a link to TEK screws on Amazon. Exist sure to select the size you need)
- Paint Roller and Tray (Here is a link to a paint roller and tray package on Amazon)
- Popular Riveter (Optional) (Here is a link to a Pop Riveter on Amazon)
- Industrial Sealant
- Gloves (Select the size you lot demand in a leather Welder's Glove. Here is one on Amazon)
- Sealant
- Construction Agglutinative (Here is a link to a Structure Adhesive on Amazon. Information technology is also mentioned in the article, "How to Adhere Siding to a Aircraft Container")
- Pull Overs (Optional)
- Magnetic Square (Here is a link to a Magnetic Square that is great for welding constitute on Amazon)

Source: https://liveinacontainer.com/how-do-you-put-a-door-and-window-in-a-shipping-container/
Posted by: lawhornnufforabing.blogspot.com
0 Response to "How To Install A Sliding Door In A Shipping Container"
Post a Comment